Posted on Leave a comment

CU monitor redesign ?

The latest PCBs for the CU monitor arrived this week. They were supposed to be the test batch to prove the release of the CU Monitors to the website. There followed a frustrating two days of soldering up and testing. Essentially I had the surface mount ADS1115 that needed to be soldered onto the board. These are tiny chips that can be tricky to solder. After soldering 3 boards I had one that worked intermittently and two that just plain failed to work. So I looked at the working one on the bus analyser and the timing of the I2C bus seemed to be causing a lot of NAKs. After tweaking the software driver, this became a lot more reliable, which suggested the bus layout on the PCB was bad! making the communication timing marginal.

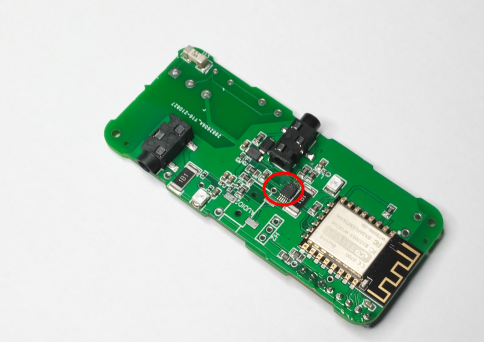
This means this will not be the last board! This got me thinking. The ADS1115 is a fairly low cost  16 bit A to D converter, initially I chose this chip because it was a module that lends itself to rapid prototyping but it has 4 channels and is accessed across an I2C bus. This chip  has caused me to redesign the CU Monitor PCB in the past because we are reading more than one channel rapidly it can cause significant slow down in the sample rate. Currently the CU monitor only uses one of the channels to boost the read speed. This makes this chip way over specified for our purpose.

So I intend to reassess the use of this chip and I will create a sequence of design/posts and explain my design decisions to document this procedure and help me get it straight in my mind

Posted on Leave a comment

Web RD

Web RD a simple development project aims to connect a display as cheaply as possible to the internet. This development is intended for anyone wishing to display information available online without actually requiring a separate device. The Web RD PCB is available in our store. This will allow you to build your own project without recourse to hardware design. The Web Rd development consists of :

  • CP2102 USB to TTL Serial Converter
  • WebRD PCB or Assembled WebRD Module
  • MAX7219 Dot matrix LED Display
  • USB Male to Female Extension lead
  • ESP8266 ESP01S

The CP2102 is a low cost stable and reliable way to connect a project to the power providing both 5V and 3.3v outputs. I’ve run them for thousands of hours with no problem. Powering a Project can can be an issue. This piece of test gear does the trick nicely.

The MAX7219 Dot matrix LED display is the low cost way to display large text.

The ESP8266 ESP01S is a very capable processor that provides plenty of processing power and a very cost-effective way of connecting to the internet.

We have available in our store 3d printed enclosures that provide housing for the display available in a mixture of colours

There are many use cases that make use of the Web Rd

  • Web Clock
  • Network connectivity display
  • Twitch Account display
  • UTube account display
  • Stock price ticker

For more information see

Posted on Leave a comment

CU monitor

The CU monitor is a development designed to calculate the current flowing to the consumer unit  from the grid and solar panels, broadcast is within the LAN and record the data to a website. I have taken a minimalist approach to keep the costs down. It uses two current clamps to measure the current


Current clamp sensor

One is clipped around one of the single core cables to the consumer unit into the house from the grid and the other other is clipped around the one of the single core cables that come from the solar panels inverter.

These connections provide the minimum number of connections. We have an algorithm that predicts whether the grid connection is importing or exporting to the grid from the profiles of the currents observed on these clamps.

The CU monitor also provides an optional photo resistor input that can be blue tacked to the front of your electricity meter as some electricity meters have an LED that becomes illuminated when power is being exported to the Grid. This can offer a confirmation that our algorithm is correct.

CU monitor Hardware

The CU monitor kit comprises our own PCB which hosts a processor that is used to calculate the AC current flow and records it to our display website. The PCB may be powered either by a USB lead or via a 240V mains power plug. The electronics are housed in an IP55 mini Junction box.

USB connection kit (no soldering required)

  • CP2102 USB to TTL Serial Converter
  • 2 or 4 Female to Female Jumper wire
  • USB extension cable
  • USB Cable
  • USB power brick or available USB socket

Mains powered kit (minimal soldering):

  • Hi Link 3.3V  3W P/N HLK-PM03
  • Varistor
  • Power Block

Either power system will suffice. The USB connection requires no actual soldering and  does not require the user to handle mains AC power. If you are comfortable  wiring into the mains power then the other kit is available.

disclaimer: handling mains voltage can be very dangerous. Do not do so unless you are qualified and comfortable with the wiring and connecting of mains power.


IP55 mini Junction box
Posted on Leave a comment

Solar panels

Many years ago I joined the Government’s FIT scheme and had solar panels installed. They have worked well so far but we only had a vague idea of how the energy they produced was being used. So I decided to develop a device to quantify and record the power usage. I wanted to make this device available to other owners of solar panels who may wish to find out more about quantity of power they produce from their solar panels to know how to predict their future usage.

The CU monitor is my attempt to make the energy usage profiles that our solar panels produce easily accessible. This will allow me to make informed choices on electrical power questions.

Posted on Leave a comment

Energy management

Whatever the outcome of the EPC and the RHI review I would like my house to be more effective at energy management. The Legacy Solar system cannot be touched without jeopardising the FIT payments for the power we generate. My solution is to create a development that will broad cast the energy usage as seen at the consumer unit and indicate whether the we are exporting to the Grid or consuming. The RHI review will probably require an electric power consuming solution and being able to effectively control this would make a big difference.

Posted on Leave a comment

Actions to take before getting an EPC

Before getting an EPC there are a number of measures we can take to improve the outcome of the EPC

  • Fit energy saving lighting
    • We already have energy efficient lighting
  • Double glaze all windows
    • We already have double glazed windows
  • Improve loft insulation
    • We currently have 10cm of loft insulation this should be increased to 27cm
  • Cavity Wall insulation
    • We have cavity wall insulation. But this was done to the property before we bought it and we have lived here for nearly than years. I will see if we have any documentation for this.
  • Upgrade to an efficient boiler
    • Our gas central heating boiler is a condensing boiler and less than 10 years old. Nominally considered efficient so our energy rating from this should be OK

The main deficiency our house has is the loft insulation. So we will increase this to 27cm.

Posted on Leave a comment

RHI and EPC

To apply to join the RHI you must have a current (within two years) energy performance certificate EPC. The EPC needs to be generated by an accredited energy assessor. Which essentially means you have to pay someone to assess your home. The sort of questions you have to answer are:

  • When was the property built? When were any extensions and conversions made?
  • If you converted the loft into a room, when was the work carried out?
  • Has the property been inspected for, or does it have any cavity wall insulation?
  • Have you very recently added any double glazed windows or doors?
  • Does the property have any under-floor insulation? Can this be seen, or do you have the receipts for this work?
  • Are you on a single or double electricity meter?
  • Have you installed any heat recovery technology

The rating of your home will depend on many factors. But typical recommendations are :

  • Insulation for your floor, roof, loft or walls. Better insulation reduces the need for heating, thereby lowering your energy bill.
  • Double glazing: windows keep in significantly more heat when they’re double-glazed, again reducing the need for heating. Solar panels: these produce cheaper, greener energy.
  •  Low-energy lighting: a smaller change that involves no structural alteration, using low-energy light bulbs is a cheap, easy way to lower energy bills.

Posted on Leave a comment

Options

The most cost effective way forward appears to be applying for the RHI (Renewable Heating Incentive): The Domestic RHI is A government scheme to pay incentives for using renewable heat.https://www.ofgem.gov.uk/environmental-and-social-schemes/domestic-renewable-heat-incentive-domestic-rhi

Options include:

  • biomass boilers (Our house is old enough to have chimneys but is in a smokeless area)
  • solar water heating (Our house has solar panels fitted on the south facing roofs)
  • certain heat pumps (The plot our house is on has space for either a air based heat pump or a ground based heat pump)

We will consider each in turn.

Biomass boilers:

  • Burn wood or pellets which require storage :
    • We have room to store fuel for a biomass boiler.
    • Fuel will need to be bought in.
  • Require manual feeding (CON)
  • Can function on demand(PRO)
  • Require tending ash disposal and cleaning (CON)

Solar water heating : Our southern facing Roofs are in use so this option is not suitable. We have out buildings that may be used but the piping and insulating of water to these locations make this problematic.

Heat Pumps :

  • Air source heat pump
    • Electrical power required to run pump.
    • Requires suitable space away from property boundaries
    • Lower Operating temperature requires resizing of radiators (CON)
    • Potential for icing in cold weather (CON)
  • Ground source heat pump
    • Electrical power required to run pump
    • Requires more space close to the house (CON)
    • Lower Operating temperature requires resizing of radiators (CON)
  • Heat pumps have a COP (Coefficient of performance) a good COP is anything over 3 with 4.5 being the max possible. The heating for our house for the last year required 26834.5 KWH. Assuming a COP of 3 we would need 8945 KWh of electricity to do this. About 50KWH per day in winter.

Posted on Leave a comment

The scale of the heating problem

Trying to quantify the heating requirements for the house: Using the last year as a benchmark, we consumed 1669 m3 of gas – found by subtracting last August’s gas meter reading from this years. This equates to 53669 KWH purely from the calorific value of the gas. The last year was unusual due to the pandemic (more time was spent at home) and the heating was set to run from the thermostat for about 50% of the year. Our bedrooms are heated to 20 Celsius with the rest of the house running colder but acceptably so. So if we use this as a benchmark we would be in the right range. Assuming the boiler is 50% efficient at turning power into heat, the power required to heat the house for the last year was 26834.5 KWH. This ignores the gas used to cook food as this can be assumed to also heat the house.

Starting point

We will aim to keep the same level of heating with a new green heating solution and re-use as much of the plumbing and infrastructure as possible to minimise the cost of the upgrade.

Posted on Leave a comment

Understanding the problem

Before you can find a solution you need to know what the problem is. We have solar panels. How much power do we generate? How much of that do we use locally? How much goes back into the Grid?

There is a need to quantify these figures (so being an engineer) I have created the CU monitor to measure these electrical data. Any heating solution is likely to need electrical power and knowing what we can source from the solar panels is a factor we need to quantify.

Currently our heating is performed by a our gas boiler. We may use the fuel burnt by this to approximate our future needs, or at least how much energy it took for a year. How much gas did we use in heating the house and cooking our food in a year?